
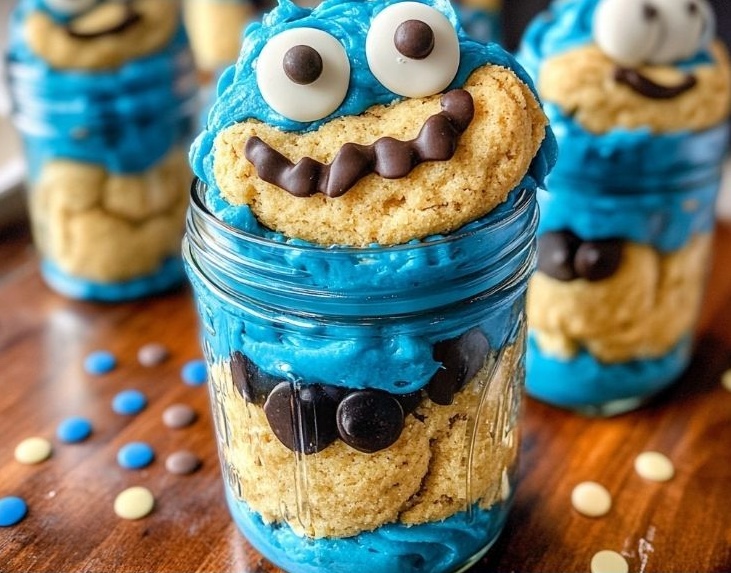
If you’re looking for a dessert that’s playful, nostalgic, and irresistibly tasty, Cookie Monster Cake Jars are here to steal the spotlight. Inspired by the beloved blue cookie-loving character, these cake jars combine layers of fluffy cake, creamy frosting, and cookie chunks in a portable, mess-free container. They’re not just delicious—they’re perfect for parties, bake sales, gifts, or simply treating yourself after a long day.
With their vibrant blue hue, delightful textures, and combination of vanilla and chocolate flavors, these jars are guaranteed to make both kids and adults smile. Plus, they’re surprisingly easy to assemble at home.
Why You’ll Love This Recipe
There’s a reason this dessert has become a viral sensation on social media—actually, several reasons:
Fun & Eye-Catching – The bright blue frosting and cookie toppings make them instantly recognizable and incredibly photogenic.
Customizable – Switch up the cake flavors, cookies, or fillings to suit your taste or the theme of your event.
Portable & Mess-Free – Perfect for grab-and-go snacking or packing into lunchboxes.
Make-Ahead Friendly – They store well in the fridge, so you can prepare them ahead for parties.
Kid-Approved – Any dessert that’s inspired by Cookie Monster is bound to be a hit with little ones.
Whether you’re making them for a birthday party or just because you have a sweet tooth, these jars deliver on flavor and presentation.
Ingredients
(Tip: You’ll find the full list of ingredients and measurements in the recipe card below.)
Here’s what you’ll need for the base recipe:
Vanilla Cake – Homemade or from a boxed mix, baked and cooled.
Blue Buttercream Frosting – You can use your favorite buttercream recipe and tint it with blue food coloring.
Chocolate Chip Cookies – Store-bought or homemade, chopped into bite-sized pieces.
Mini Chocolate Chip Cookies – For garnish and extra crunch.
Whipped Cream – Optional, but adds a nice lightness to the layers.
Blue Food Coloring – Gel works best for vibrant color without altering the frosting texture.
Clear Mason Jars or Plastic Jars – 8–12 oz size works perfectly for layered desserts.
Directions
Prepare the Cake
Bake your vanilla cake according to your chosen recipe or boxed mix. Let it cool completely before cutting it into cubes or using a round cutter to fit your jars.Make the Blue Buttercream
Whip up your buttercream, then add blue food coloring until you get that signature Cookie Monster hue. Set aside.Layer the Cake Jars
Add a layer of cake at the bottom of each jar.
Pipe or spoon a layer of blue buttercream over the cake.
Sprinkle in chunks of chocolate chip cookies.
Repeat the layers until the jar is full, ending with frosting on top.
Decorate
Top each jar with mini cookies, whipped cream, and extra crumbs for that “Cookie Monster chaos” look.Chill or Serve
These jars can be served immediately or chilled in the refrigerator for 1–2 hours for a firmer texture.
Servings and Pairing
This recipe yields 6–8 cake jars depending on jar size and layering thickness.
Perfect Pairings:
Milk – The classic Cookie Monster beverage choice.
Coffee or Latte – Balances the sweetness for adults.
Vanilla Ice Cream – Scoop it right on top for a decadent sundae-in-a-jar experience.
Variations
Want to switch things up? Try these ideas:
Chocolate Overload – Use chocolate cake and chocolate frosting for a richer dessert.
Birthday Cake Style – Swap cookies for rainbow sprinkles and use funfetti cake.
Peanut Butter Twist – Add a swirl of peanut butter frosting between layers.
Healthier Version – Use whole wheat flour cake, Greek yogurt frosting, and lower-sugar cookies.
Storage/Reheating
Refrigerator – Store sealed jars for up to 4 days.
Freezer – Freeze for up to 1 month; thaw overnight in the fridge before serving.
Room Temperature – Best served within a few hours if left out, especially in warm weather.
FAQs
1. Can I make these cake jars the night before?
Yes! They taste even better the next day as the flavors meld together. Just store them in the fridge.
2. Do I need to use mason jars?
Not at all—any small, clear food-safe container will work.
3. Can I make them gluten-free?
Absolutely! Just use gluten-free cake mix and cookies.
4. How long can they stay out at a party?
Up to 2 hours is fine, but refrigerate afterward to keep them fresh.
Conclusion
Cookie Monster Cake Jars are more than just a dessert—they’re a little jar of happiness. From their playful color to their sweet layers, they bring joy to anyone who digs in. Whether you’re making them for a themed party, a bake sale, or just to brighten someone’s day, they’re sure to be a crowd-pleaser.
So grab your jars, your cookies, and your frosting—and let the Cookie Monster magic begin!
Print
Cookie Monster Cake Jars
- Total Time: 50 minutes
- Yield: 8 servings
Description
These adorable Cookie Monster Cake Jars combine fluffy vanilla cake, creamy blue buttercream, and chunks of chocolate chip cookies layered in a jar for a portable, mess-free dessert. Perfect for kids’ parties, special occasions, or just a fun weekend baking project!
Ingredients
Blue Cookie Monster Frosting
- ½ cup (1 stick) unsalted butter room temperature
- ½ cup vegetable shortening
- 3 cups powdered sugar
- 2 tablespoons milk or coffee creamer
- 1 teaspoon vanilla
- 1 drop electric blue Americolor gel color
- 2 drops royal blue Chef Masters gel color
Cake
- 15 oz box white or vanilla cake mix Plus ingredients on cake mix box
- 10 chopped Oreos
Jar Layers
- 8-10 chopped Oreos
- 8-10 chopped chocolate chip cookies any brand will work
- 8 candy eyes
- 2 chocolate chip cookies cut in half
Instructions
Cake
- Follow steps on cake mix box to bake the cake. However, after you mix the batter, fold in about 1/2 of the chopped oreos. Bake and let cool for 30 minutes.
Blue Cookie Monster Frosting
- Add butter and shortening to a mixing bowl. Mix until smooth.
- Add in one cup of powdered sugar and the vanilla. Mix until fully combined, starting with a low speed then increasing to medium speed.
- Add in the remaining two cups of powdered sugar and the 2 tbsp of milk (or coffee creamer) and the gel food coloring. Mix starting on low and increase the speed slowly to high. Beat for 2-3 mins.
- Use a spoon to test the silkiness of the frosting, if its not smooth add in one more tbsp milk, then beat on medium-high for 4-5 more mins creating a fluffy and easy to pipe frosting.
Assembly
- Add frosting to piping bag fitted with tip 1M.
- Add 1-2 scoops of cake into the mason jar. Use the scooper to push it down.
- Pipe frosting into the jar right on top of the cake. Top with chopped chocolate chip cookies and chopped oreo cookies. Add another scoop of cake, followed by frosting, then cookies
- Repeat once more if there is space. End with frosting. Add two candy eyeballs and half a chocolate chip cookie
- I decorated the top of the jar with blue ribbon using gluedots to hold it in place.
Notes
Storage:
- To Store: Stored your cake in a jar in the refrigerator for 3-4 days. Bring the jars to room temperature before serving.
- To Freeze: You can freeze these desserts, covered tightly, for up to 2 months.
Tips:
- I put 8-10 chopped chocolate chip cookies and Oreos in the ingredients. The amount you need will depend on how much of each you want in the cake jar. Feel free to adjust to your preference.
- You can decorate the top of the jar with blue ribbon using glue dots to hold it in place.
- This dessert in a jar makes a fun gift for someone special. Simply tie a ribbon with a spoon to the jar so they are ready for the first scoop!
- If you are unfamiliar with using a piping bag, check out the decorating basics bundle to learn proper instructions on how to fill a piping bag.
- Prep Time: 5 minutes
- Cook Time: 45 minutes