

If you’ve ever wanted to experience a bite of Danish coziness, Drømmekage—known in English as the Danish Dream Cake—is the perfect place to start. Originating from a small village in Denmark in the 1960s, this cake is a true Scandinavian classic. Imagine a soft, buttery sponge cake topped with a luscious layer of caramelized coconut — sweet, slightly chewy, and utterly divine. It’s the kind of dessert that feels like a warm hug on a chilly day.
So, grab your mixing bowl and let’s uncover why this simple Danish creation has become a beloved treat across the world.
Why You’ll Love This Recipe
There’s a reason this cake has been passed down through generations in Denmark—it’s comfort food at its best. Here’s why you’ll fall in love with this dreamy dessert:
- Perfectly Balanced Flavors: The cake itself is light and fluffy, while the topping brings a rich, caramelized sweetness that melts beautifully into the sponge.
- Simple and Fuss-Free: You don’t need any special equipment—just basic ingredients and a few mixing bowls.
- Unique Texture: The contrast between the soft sponge and the crispy coconut topping is simply irresistible.
- Crowd-Pleaser: Whether it’s for a potluck, tea party, or just a cozy Sunday treat, everyone will be asking for seconds.
- Authentic Danish Tradition: This cake gives you a true taste of Scandinavian baking without needing a trip to Denmark.
Think of it as the Danish equivalent of your favorite coffee cake—only more buttery, more indulgent, and with a signature coconut crunch that makes it unforgettable.
Ingredients You’ll Need
(Tip: You’ll find the full list of ingredients and measurements in the recipe card below.)
Here’s everything you’ll need to make this delightful Danish Dream Cake:
For the Sponge Cake:
- 1½ cups (180g) all-purpose flour
- 1½ tsp baking powder
- ¼ tsp salt
- 3 large eggs
- 1 cup (200g) granulated sugar
- 1 tsp vanilla extract
- ½ cup (125ml) milk
- ½ cup (115g) unsalted butter
For the Coconut Caramel Topping:
- ¾ cup (150g) brown sugar
- ¾ cup (75g) shredded coconut
- ⅓ cup (75g) unsalted butter
- ¼ cup (60ml) milk
Each ingredient plays an essential role — the cake is tender and moist from the butter and milk, while the topping adds that unmistakable chewy caramel finish.
Let’s Get Started
Now that your ingredients are ready, let’s bake your dream cake!
Step 1: Preheat and Prepare
Preheat your oven to 350°F (175°C). Grease and line a rectangular baking pan (around 9×13 inches) with parchment paper.
Step 2: Mix the Batter
In a large bowl, whisk the eggs and sugar together until pale and fluffy. Stir in the vanilla extract.
In a small saucepan, melt the butter and mix it with milk. Slowly pour this warm mixture into the egg mixture while stirring continuously.
Step 3: Combine Dry Ingredients
In another bowl, combine flour, baking powder, and salt. Gradually add the dry mixture to the wet ingredients, folding gently until a smooth batter forms.
Step 4: Bake the Cake
Pour the batter into the prepared pan and bake for 20–25 minutes, or until a toothpick inserted into the center comes out clean.
Step 5: Make the Coconut Topping
While the cake bakes, prepare the topping. In a small saucepan, melt butter over medium heat. Add brown sugar, milk, and shredded coconut. Stir until everything is well combined and slightly thickened.
Step 6: Add the Topping
When the cake is done, remove it from the oven. Pour the warm coconut mixture evenly over the top.
Step 7: Caramelize the Top
Return the cake to the oven and bake for another 5–10 minutes, or until the topping is golden brown and bubbling.
Let the cake cool slightly before slicing—it tastes best when served warm!

Servings and Pairing
This recipe serves about 10–12 people, depending on how generous your slices are!
Perfect Pairings:
- Coffee or Tea: Just like the Danes, enjoy it with a strong cup of coffee or black tea.
- Vanilla Ice Cream: A scoop of vanilla ice cream complements the caramel topping beautifully.
- Whipped Cream: Lightly sweetened whipped cream adds an airy contrast to the dense, moist cake.
- Fresh Fruit: Pair with sliced strawberries or raspberries for a refreshing touch.
Whether it’s breakfast, dessert, or a mid-afternoon indulgence, Drømmekage fits every moment perfectly.
Variations
Looking to give this classic a creative twist? Try these variations:
- Chocolate Dream Cake: Add 2 tablespoons of cocoa powder to the batter for a chocolatey twist.
- Nutty Version: Add chopped almonds or pecans to the topping for extra crunch.
- Citrus Touch: Stir in some orange or lemon zest to the batter for a fresh flavor burst.
- Gluten-Free: Use a gluten-free flour blend for a celiac-friendly version.
- Vegan Option: Substitute eggs with flax eggs, butter with vegan margarine, and milk with coconut or almond milk.
Each variation offers a new way to enjoy the beloved Danish classic!
Storage Tips
- Room Temperature: Store in an airtight container for up to 3 days.
- Refrigerator: Keeps fresh for up to 5 days when refrigerated.
- Freezer: Wrap slices individually in plastic wrap and freeze for up to 3 months.
- To Reheat: Warm in the microwave for 10–15 seconds or in the oven at 300°F (150°C) for 5 minutes for that “just baked” feel.
The topping may soften slightly over time, but a quick warm-up restores its caramel crunch.
FAQs
1. What does Drømmekage mean?
“Drømmekage” translates to “Dream Cake” in English—a name that perfectly describes its light, dreamy texture and sweet topping.
2. Can I use desiccated coconut instead of shredded?
Yes! Desiccated coconut works fine, though shredded gives a chewier texture.
3. Can I make this cake ahead of time?
Absolutely. Bake the cake a day in advance and store it covered. Warm slightly before serving for the best flavor.
4. Why is my topping too runny?
You may not have cooked the caramel mixture long enough. Let it thicken slightly before spreading over the cake.
5. Can I double the recipe?
Yes, simply double all ingredients and use a larger baking pan. Adjust baking time slightly.
Final Thoughts
Danish Dream Cake is more than just a dessert—it’s a slice of Scandinavian comfort and tradition. Every bite combines buttery softness with a caramel-coconut topping that’s impossible to resist. It’s the kind of cake that makes ordinary days feel special, perfect for sharing with friends or enjoying solo with a warm drink.
Print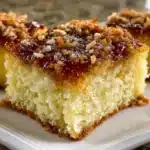
Danish Dream Cake
- Total Time: 50 minutes
- Yield: 12 servings
- Diet: Vegetarian
Description
Discover the classic Danish Dream Cake (Drømmekage) — a soft, buttery sponge cake topped with rich caramelized coconut. Perfect for coffee breaks, celebrations, or cozy afternoons. Easy, delicious, and truly dreamy!
Ingredients
For the Sponge Cake:
- 1½ cups (180g) all-purpose flour
- 1½ tsp baking powder
- ¼ tsp salt
- 3 large eggs
- 1 cup (200g) granulated sugar
- 1 tsp vanilla extract
- ½ cup (125ml) milk
- ½ cup (115g) unsalted butter
For the Coconut Caramel Topping:
- ¾ cup (150g) brown sugar
- ¾ cup (75g) shredded coconut
- ⅓ cup (75g) unsalted butter
- ¼ cup (60ml) milk
Instructions
- Preheat the oven: Set to 350°F (175°C). Grease and line a 9×13-inch baking pan with parchment paper.
- Prepare the batter: In a large bowl, whisk eggs and sugar until light and fluffy. Add vanilla extract.
- Combine milk and butter: Melt butter, mix with milk, and gradually add to the egg mixture while stirring.
- Add dry ingredients: In another bowl, whisk flour, baking powder, and salt. Gently fold the dry ingredients into the wet mixture until smooth.
- Bake the cake: Pour batter into the pan and bake for 20–25 minutes or until a toothpick inserted comes out clean.
- Prepare the topping: While the cake bakes, melt butter in a saucepan. Stir in brown sugar, milk, and shredded coconut. Cook until thick and glossy.
- Add topping and bake again: Remove the cake from the oven, spread the topping evenly, and return it to bake for another 5–10 minutes until golden and bubbling.
- Cool and serve: Let the cake cool slightly before slicing. Enjoy warm or at room temperature!
Notes
- Use fresh coconut: For a richer flavor, lightly toast the coconut before adding it to the topping.
- Avoid overbaking: The sponge should stay soft—check it a few minutes early.
- Enhance flavor: Add a touch of lemon zest or a splash of rum for depth.
- Make ahead: This cake actually tastes better the next day as the topping soaks in!
- Storage: Store in an airtight container at room temperature for up to 3 days or refrigerate for up to 5.
- Prep Time: 20 minutes
- Cook Time: 30 minutes