
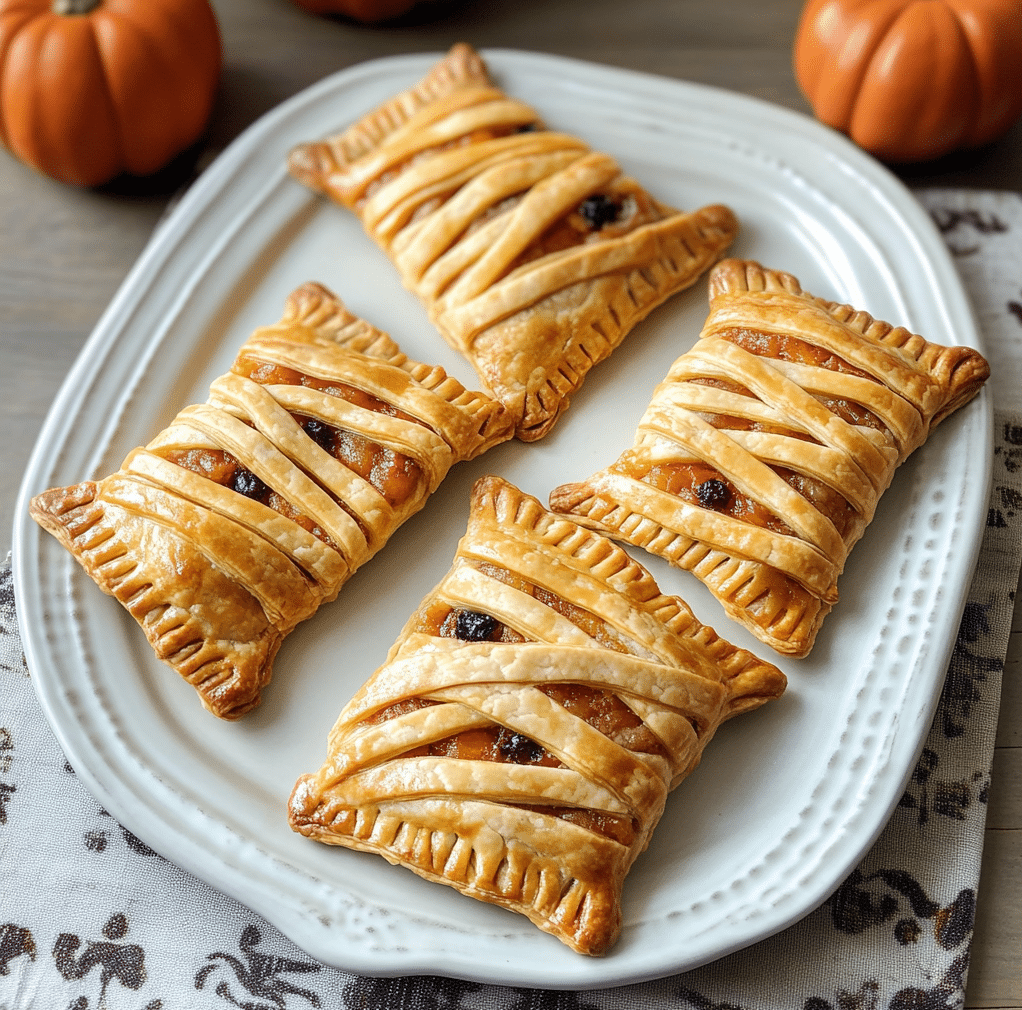
Halloween is the perfect time to let your creativity run wild in the kitchen, and nothing says spooky-yet-fun like Mummy Hand Pies. These adorable, flaky pastries are shaped to resemble mini mummies, complete with golden-brown bandages and peeking candy eyes. Whether you’re planning a Halloween party, looking for a fun activity with kids, or simply want to surprise your family with a festive treat, mummy hand pies are the ultimate blend of cute, creepy, and delicious.
Why You’ll Love This Recipe
There are plenty of Halloween recipes out there, but Mummy Hand Pies stand out for several reasons:
Fun for all ages – Kids love helping with the assembly, especially placing the candy eyes.
Customizable flavors – Whether you love fruit fillings, chocolate, or savory options, you can adapt this recipe to suit any taste.
Quick and easy – With premade pie crusts or puff pastry, you can assemble and bake these in less than an hour.
Perfect for parties – They’re bite-sized, portable, and festive, making them ideal for gatherings.
Instagram-worthy – These pies don’t just taste amazing, they look fantastic on a Halloween-themed snack table.
Think of these pies as the Halloween equivalent of sugar cookies—simple, versatile, and always a crowd-pleaser.
Ingredients
(Tip: You’ll find the full list of ingredients and measurements in the recipe card below.)
To make your mummy hand pies, you’ll need the following:
Pie crust or puff pastry – Store-bought or homemade, rolled out and ready to cut.
Filling of your choice – Apple pie filling, Nutella, pumpkin puree, jam, or even savory options like pizza sauce and mozzarella.
Egg wash – Beaten egg with a splash of milk or water to give that golden finish.
Sugar (optional) – For sprinkling on top if making sweet pies.
Candy eyes – For that fun mummy look.
Flour (for dusting) – To prevent sticking when rolling out dough.
Optional extras include cinnamon, powdered sugar, or even a light glaze depending on whether you prefer sweet or savory.

Directions
Making mummy hand pies is easier than it looks. Follow these steps for best results:
Prepare the dough – Roll out your pie crust or puff pastry on a lightly floured surface. Cut into rectangles about 3×5 inches (or smaller for bite-sized mummies).
Add the filling – Place a spoonful of your chosen filling in the center of half of the rectangles, leaving edges clear.
Cut the bandages – With the other half of the rectangles, use a knife or pizza cutter to make horizontal slits, creating “mummy bandages” (don’t cut all the way through).
Assemble the pies – Lay the “bandaged” dough over the filled rectangles, pressing edges with a fork to seal.
Brush with egg wash – This helps give the pies that golden, bakery-style finish.
Bake – Place on a parchment-lined baking sheet and bake at 375°F (190°C) for 15–20 minutes, or until golden brown.
Add eyes – Once slightly cooled, stick on candy eyes using a dab of frosting, glaze, or even a bit of melted chocolate.
That’s it—you now have perfectly spooky mummy hand pies ready to impress!
Servings and Pairing
This recipe typically makes 8–10 mummy hand pies, depending on the size you cut your dough. They’re excellent served as a dessert or a party snack.
For sweet versions, pair them with:
A scoop of vanilla ice cream
Warm caramel sauce for dipping
A cup of hot apple cider or pumpkin spice latte
For savory mummy hand pies, pair with:
A side of marinara sauce for dipping
A small salad for balance
Spooky Halloween punch to keep the theme going
They’re versatile enough to serve as a standalone treat or part of a bigger Halloween spread.
Variations
One of the best things about mummy hand pies is how customizable they are. Here are a few fun twists to try:
Sweet Options:
Apple pie filling with cinnamon sugar dusting
Nutella with banana slices inside
Pumpkin puree with cream cheese swirl
Strawberry jam with powdered sugar topping
Savory Options:
Pizza mummy pies with mozzarella and pepperoni
Chicken pot pie filling for a hearty snack
Ham and cheese for a quick bite
You can even mix and match to make a platter of different mummy flavors so everyone gets a surprise.
Storage/Reheating
To keep your mummy hand pies fresh and delicious:
Room temperature: Store in an airtight container for up to 2 days.
Refrigerator: Store for up to 4 days; reheat in a toaster oven or air fryer to crisp them back up.
Freezer: Freeze unbaked pies for up to 2 months. When ready, bake straight from frozen, adding a few extra minutes to the baking time.
Avoid microwaving them as it tends to make the pastry soggy instead of flaky.
FAQs
Can I make these ahead of time?
Yes! You can assemble the pies and freeze them unbaked. Just pop them in the oven straight from the freezer when you’re ready.
What can I use instead of candy eyes?
Mini chocolate chips, raisins, or small dots of icing make great substitutes if you don’t have candy eyes on hand.
Can I use puff pastry instead of pie crust?
Absolutely! Puff pastry gives an extra flaky texture, making the pies even more irresistible.
Do I need to seal the edges with a fork?
Yes, sealing with a fork prevents the filling from leaking out during baking and gives a neat finish.
Are mummy hand pies kid-friendly?
Definitely! Kids love both making and eating them. Just supervise younger ones when handling knives for the “bandages.”
Conclusion
Mummy hand pies are more than just a treat—they’re a Halloween activity, party centerpiece, and delicious snack all in one. With minimal ingredients and maximum impact, they’re a go-to recipe when you want something festive without too much fuss. Plus, the ability to switch between sweet and savory makes them versatile enough to satisfy any craving.
Print
Mummy Hand Pies
- Total Time: 35 minutes
- Yield: 8 Servings
- Diet: Vegetarian
Description
Spooky and delicious, these Mummy Hand Pies are the perfect Halloween treat! Easy to make with pie crust, your choice of filling, and fun candy eyes.
Ingredients
- 2 sheets pie crust or puff pastry (store-bought or homemade)
- ½ cup filling of your choice (apple pie filling, Nutella, jam, or pizza sauce + mozzarella for savory)
- 1 egg (for egg wash, whisked with 1 tbsp milk or water)
- Candy eyes (or mini chocolate chips/icing dots as a substitute)
- 1 tbsp flour (for dusting)
- Optional: sugar or cinnamon sugar for sprinkling (if sweet version)
Instructions
- Preheat oven to 375°F (190°C). Line a baking sheet with parchment paper.
- Roll out dough on a lightly floured surface. Cut into rectangles (about 3×5 inches).
- Place a spoonful of filling in the center of half the rectangles, leaving edges clear.
- On the remaining rectangles, cut thin strips to resemble mummy “bandages.”
- Lay the bandaged dough over the filled base, pressing edges with a fork to seal.
- Brush tops with egg wash for a golden finish.
- Bake for 15–20 minutes or until golden brown.
- Cool slightly, then attach candy eyes using frosting, glaze, or melted chocolate.
- Serve warm or at room temperature.
Notes
- For sweeter pies, sprinkle sugar or cinnamon sugar before baking.
- For savory pies, serve with marinara dipping sauce.
- Make ahead and freeze unbaked pies—just bake straight from frozen, adding 2–3 minutes.
- Don’t overfill—too much filling will cause leaks during baking.
- Prep Time: 15 minutes
- Cook Time: 20 minutes