Description
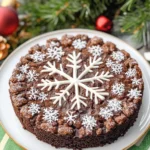
This Snowflake Brownie Cake is rich, fudgy, and dusted with powdered sugar to resemble delicate snowflakes. A perfect holiday dessert that’s easy, festive, and irresistibly chocolatey!
Ingredients
- 1 cup unsalted butter (melted and slightly cooled)
- 1 ½ cups granulated sugar
- ½ cup brown sugar
- 4 large eggs
- 2 teaspoons vanilla extract
- 1 cup all-purpose flour
- ¾ cup unsweetened cocoa powder
- ½ teaspoon salt
- ½ teaspoon baking powder
- 1 cup semi-sweet chocolate chips (optional)
- Powdered sugar (for dusting)
Instructions
- Preheat Oven: Set your oven to 350°F (175°C). Grease a 9-inch round or square cake pan and line it with parchment paper.
- Mix Wet Ingredients: In a bowl, whisk together melted butter, granulated sugar, and brown sugar. Add eggs one by one, whisking after each addition. Stir in vanilla extract.
- Combine Dry Ingredients: In another bowl, sift flour, cocoa powder, salt, and baking powder.
- Mix Together: Gradually fold the dry ingredients into the wet mixture. Stir gently until combined — don’t overmix.
- Add Chocolate Chips: Fold in chocolate chips for extra gooeyness.
- Bake: Pour the batter into the pan and smooth the top. Bake for 25–30 minutes, or until a toothpick inserted in the center comes out with a few moist crumbs.
- Cool & Decorate: Let the cake cool completely. Dust generously with powdered sugar using a snowflake stencil for a festive design.
Notes
- Don’t Overmix: Stir the batter just until combined to keep it fudgy, not cakey.
- Check Early: Start checking at 25 minutes — brownies continue to cook after being removed from the oven.
- Use Quality Cocoa: The better the cocoa, the richer the flavor.
- Snowflake Design: Make or print a paper snowflake stencil to achieve a perfect snowy pattern.
- Serve Warm: Reheat slices slightly for that fresh-from-the-oven gooey texture.
- Prep Time: 15 minutes
- Cook Time: 30 minutes